Vertex Tools Sketchup Crack Serial DOWNLOAD: vertex tools sketchup, vertex tools sketchup crack, vertex tools sketchup license key, vertex. Vertex tools sketchup crack serial. Vertex Tools Keygen. Vertex Tools. Vertex tools sketchup vertex tools sketchup crack vertex tools. Plugin vertex tools sketchup serial vertex tools sketchup 2017 vertex tools. Google SketchUp Pro 2017 Crack Keygen & Patch Full Version Free Download Introduction: is an expert planning programming utilized by a.
- Project Neptune Keylogger Free Version
- Project Neptune Keylogger Download Free
- Project Neptune Keylogger Free Download
- Project Neptune Keylogger Free Trial
Project Neptune Keylogger
Download: http://hfiles.ro/download/projectneptunev2.0bykaramora.com.rar/1028676. Project Neptune Keylogger v1.7 By: Unknown 07:48 Project Neptune includes many features that separate it from similar programs and simply make it the best - and no, these features and functions aren't half-way coded, dinky scripts.
Once it's downloaded, extract the folder to wherever you want and open it up. Then open the Project Neptune.exe.
We are going to work our way through the different sections now, so there may be alot of text. Well, we will start with the tab titled: 'Keystrokes'.
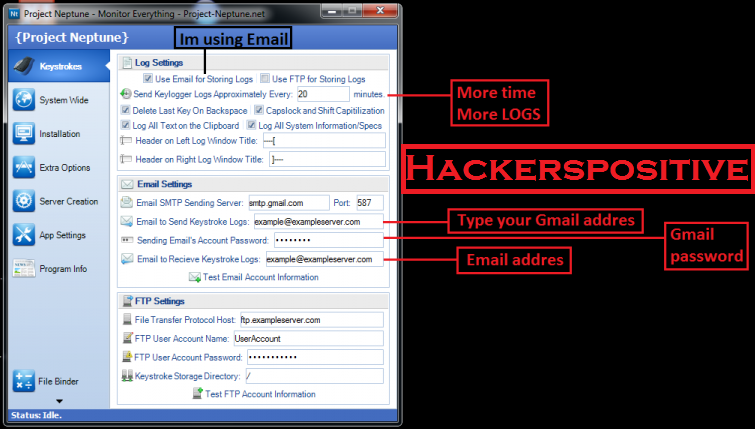
To leave this simple, we are going to check the top box, 'Use Email for Storing Logs' instead of 'FTP(File Transfer Protocol)'. Leave the log time as 20 minutes as I think that is a good time frame between logs.
If they aren't already selected, check the four checkboxes below the time delay.
Leave the 'Header' options as they are.
For the Email Settings, I used a GMail account so my SMTP Sending Server was smtp.gmail.com with a port of 587. If you are using Windows Live, simply change the SMTP from smtp.gmail.com to smtp.live.com.
For the next box, put in your email address, then your email accounts password below that, and then your email address again in the box under that.
(NB: Do not worry, no one but you sees the email and password, but if you're really skeptical, just spend a few minutes to make a new account to use. Remember to remember the details as this is where your victims logs go to!) To test your email click the Test Email Account Information button.
Just leave the FTP Settings area alone.

For example, with the first set of options, 'Task Manager', I like to keep the first option checked, 'Keep Task Manager Enabled'. I know myself if suddenly my Task Manager wouldn't work I would get kinda suspicious..
So, just leave the first option check and move onto the 'Website Blocking' section. We just want to leave this empty, unless there is a specific site you don't want your victims to access, if you want to have a laugh, then check the box and type in http://www.google.com, that way, your slave can't access Google.
You can leave the 'System Settings' section as it is as well.

With the 'Miscellaneous' section, make sure that the only boxes ticked are send Installation Message on User's First Program Run and Don't Send Keystroke Logs if Nothing Has Been Typed by User.
The first one will let you know when the keylogger is installed and the second prevents your inbox from being majorly spammed with empty emails.
As we are on the free version of Project Neptune we can't change much in the Screenshots section, but if you want to see a screenshot of what your slave is doing, check the top option. You won't be able to affect the time between screenshots as we are using the free version.
Project Neptune Keylogger Free Version
Trust you like My this Tutorial. I posted the keylogger a while back and it rapidly turned into the most mainstream keylogger on Hack Forums inside a month. It's still being developed right up 'til the present time, and it will naturally upgrade on start up if there is a redesign accessible.
Note: Most of these pictures are out of date. I'll get around to overhauling them sooner or later soon. Much obliged!
Project Neptune Keylogger Download Free

Project Neptune Keylogger Free Download
Since that is off the beaten path, to the excercise!
{project Neptune}
Project Neptune Keylogger Free Trial
– Download Information –
Download join: http://www.project-neptune.net/download/
What precisely makes this keylogger so uncommon?
Basically, it is a standout amongst the most steady, professional, and all around elegantly composed lumberjacks around. It gives careful consideration to the minor subtle elements and offers a lot of gimmicks.
– Tutorial –
Step One – Downloading Microsoft net framework for mac.
Most importantly, verify you go to the connection above to download it. You will require Winrar to concentrate it.

For example, with the first set of options, 'Task Manager', I like to keep the first option checked, 'Keep Task Manager Enabled'. I know myself if suddenly my Task Manager wouldn't work I would get kinda suspicious..
So, just leave the first option check and move onto the 'Website Blocking' section. We just want to leave this empty, unless there is a specific site you don't want your victims to access, if you want to have a laugh, then check the box and type in http://www.google.com, that way, your slave can't access Google.
You can leave the 'System Settings' section as it is as well.
With the 'Miscellaneous' section, make sure that the only boxes ticked are send Installation Message on User's First Program Run and Don't Send Keystroke Logs if Nothing Has Been Typed by User.
The first one will let you know when the keylogger is installed and the second prevents your inbox from being majorly spammed with empty emails.
As we are on the free version of Project Neptune we can't change much in the Screenshots section, but if you want to see a screenshot of what your slave is doing, check the top option. You won't be able to affect the time between screenshots as we are using the free version.
Project Neptune Keylogger Free Version
Trust you like My this Tutorial. I posted the keylogger a while back and it rapidly turned into the most mainstream keylogger on Hack Forums inside a month. It's still being developed right up 'til the present time, and it will naturally upgrade on start up if there is a redesign accessible.
Note: Most of these pictures are out of date. I'll get around to overhauling them sooner or later soon. Much obliged!
Project Neptune Keylogger Download Free
Project Neptune Keylogger Free Download
Since that is off the beaten path, to the excercise!
{project Neptune}
Project Neptune Keylogger Free Trial
– Download Information –
Download join: http://www.project-neptune.net/download/
What precisely makes this keylogger so uncommon?
Basically, it is a standout amongst the most steady, professional, and all around elegantly composed lumberjacks around. It gives careful consideration to the minor subtle elements and offers a lot of gimmicks.
– Tutorial –
Step One – Downloading Microsoft net framework for mac.
Most importantly, verify you go to the connection above to download it. You will require Winrar to concentrate it.
After you have downloaded Project Neptune, just modifiable the envelope containing all the records to your desktop, in the same way as demonstrated:
Most importantly, you need to choose what you need to use to store
logs. For email, I suggest utilizing Gmail, and you can
make a record for that here:
https://www.google.com/accounts/Newaccount?service=mail
This excercise will be utilizing Email, particularly Gmail, yet in the event that you need to utilize FTP, utilizing Drivehq, its free and permits a considerable measure of storage:http://www.drivehq.com/secure/Freesignup.aspx
After you are carried out making your Gmail record, examine the picture underneath:
–
Step Three – Setting Up System Settings
There isn't much to do on this tab, however I'll give a little clarification on what everything does:
Number 1 – These choices essentially handicap taskmanager's capacity to end your server's methodology. In the event that you enact any, pick the last one, it has the littlest suspicion level!
Number 2 – This is for blocking sites, however be exhausted, in light of the fact that it obliges administrator rights and will crash in the event that it doesn't have it. Right click on the crate to include destinations.
Number 3 – All of these choices are clear as crystal, however be cautioned: they oblige administrator rights and will result in the server to crash if the customer doesn't have administrator rights. Mouse over them for more data.
–
Step Four – Installation Settings
This tab is for setting up how your keylogger gets introduced on your customer. You have to soften your document with the goal that it won't get messed around with after it is ran. This is simply a wellbeing peculiarity in the event that you'll be tainting savvy individuals, yet I generally utilize it!
–
Step Five – Extra Options
These are those additional choices that simply make it additionally energizing. Utilize the Fake Error Message in the event that you would prefer not to tie it to something/grave it.
–
Step Six – Server Generation
This is the last step!
Click on the 'Server Generation' tab and feel free to duplicate down the Uninstall secret key – you'll require this on the off chance that you ever test PN out on your machine. After that, feel free to hit 'Create New Server' and you're set to go!
Since you are carried out, your server record ought to be produced if everything went alright. In the event that you have any inquiries, don't hesitate to ask.
Protip: Click on the following tab and hit 'Spare Settings' so you don't need to enter the majority of this each time you utilize it!
